
(1) ZSH 설치
(2) 기본셸 ZSH로 변경
|
1
2
3
4
5
6
7
|
chsh -s $(which zsh)
or
riemannk@riemannk-Lenovo:/mnt/c/Users/riemannk$ which zsh
/usr/bin/zsh
riemannk@riemannk-Lenovo:/mnt/c/Users/riemannk$ sudo chsh -s /usr/bin/zsh
|
cs |


(3) oh-my-zsh 설치
|
1
2
3
4
5
|
sudo apt install git curl
sudo sh -c "$(curl -fsSL https://raw.githubusercontent.com/robbyrussell/oh-my-zsh/master/tools/install.sh)"
upgrade_oh_my_zsh
|
cs |
- 적용 결과 화면 -

(4) oh-my-zsh 테마 설정
|
1
2
3
4
5
6
7 |
vi ~/.zshrc
---------------
ZSH_THEME="robbyrussell" -> ZSH_THEME="agnoster"
---------------
sudo apt install fonts-powerline
source ~/.zshrc |
cs |

(5) 플러그인
- alias-tips : 명령어 입력시, 해당 명령어와 똑같은 alias가 있을때 있다고 알려줌
|
1
2
3
4
5
6
7
8
|
cd ${ZSH_CUSTOM1:-$ZSH/custom}/plugins
git clone https://github.com/djui/alias-tips.git
vi ~/.zshrc
---------------
plugins=(git ... alias-tips)
---------------
source ~/.zshrc
|
cs |

- 적용 결과 화면 -

- zsh-syntax-highlighting : 명령어가 올바른지 아닌지 하이라이팅을 해서 알려줌
|
1
2
3
4
5
6
7
|
git clone https://github.com/zsh-users/zsh-syntax-highlighting.git ${ZSH_CUSTOM:-~/.oh-my-zsh/custom}/plugins/zsh-syntax-highlighting
vi ~/.zshrc
---------------
plugins=(git ... zsh-syntax-highlighting)
---------------
source ~/.zshrc
|
cs |
- 적용 결과 화면 -

- zsh-autosuggestions : 명령어를 입력할때 전에 사용했던 명령어를 보여줌
|
1
2
3
4
5
6
7
|
git clone https://github.com/zsh-users/zsh-autosuggestions ${ZSH_CUSTOM:-~/.oh-my-zsh/custom}/plugins/zsh-autosuggestions
vi ~/.zshrc
---------------
plugins=(git ... zsh-autosuggestions)
---------------
source ~/.zshrc
|
cs |
- 적용 결과 화면 -

- zsh-autojump : 전에 사용했던 폴더로 간단히 이동
|
1
2
3
4
5
6
7
8
9
10
11
12
13
14 15 16 |
git clone git://github.com/wting/autojump.git ${ZSH_CUSTOM:-~/.oh-my-zsh/custom}/plugins/zsh-autojump
or git clone http://github.com/wting/autojump.git ${ZSH_CUSTOM:-~/.oh-my-zsh/custom}/plugins/zsh-autojump cd ${ZSH_CUSTOM1:-$ZSH/custom}/plugins/zsh-autojump python3 install.py
or
python install.py
or ./install.py vi ~/.zshrc
---------------
# autojump
[[ -s /home/(계정이름)/.autojump/etc/profile.d/autojump.sh ]] && source /home/riemannk/.autojump/etc/profile.d/autojump.sh
autoload -U compinit && compinit -u
---------------
source ~/.zshrc
|
cs |

or
sudo apt-get install autojump

그리고 plugins에 추가
.zshrc 에 추가하는 명령줄은 install.py 실행 후 아래 사진과 같은 문구가 나오는데 저걸 복붙하자

※ 사용법 : j [방문한 적이 있던 폴더]
- 적용 결과 화면 -

(6) 그외 설정들
멀티라인안됨 이유는 모름 틀린이유를 모르겠으니까 맞을꺼임 일단 올려놓음
|
1
2
3
4
5
6
7
8
9
10
11
12
13
14
15
16
17
18
19
20
21
22
23
24
25
26
27
28 |
vi ~/.oh-my-zsh/themes/agnoster.zsh-theme
---------------
#Mutiline
prompt_newline() {
if [[ -n $CURRENT_BG ]]; then
echo -n "%{%k%F{$CURRENT_BG}%}$SEGMENT_SEPARATOR %{%k%F{blue}%}$SEGMENT_SEPARATOR"
else echo -n "%{%k%}"
fi
echo -n "%{%f%}"
CURRENT_BG=''
}
## Main prompt
build_prompt() {
RETVAL=$?
prompt_status
prompt_virtualenv
prompt_aws
prompt_context
prompt_dir
prompt_git
prompt_bzr
prompt_hg
prompt_newline
prompt_end
}
--------------- |
cs |

- Hostname 지우기 (사용자계정@Hostname)
|
1
2
3
4
5
6
7
8
9
10
|
vi ~/.zshrc
---------------
#no hostname
prompt_context() {
if [[ "$USER" != "$DEFAULT_USER" || -n "$SSH_CLIENT" ]]; then
prompt_segment black default "%(!.%{%F{yellow}%}.)$USER"
fi
}
---------------
source ~/.zshrc
|
cs |

- 실행 결과 화면 -

- setopt correct 스펠링 체크 (오타 입력시 명령어 추천)

- batcat (cat 상위호환)

- Home, End키 활성화
|
1
2
3
4
5
6
7
|
vi ~/.zshrc
---------------
#Enable Home and End Key
bindkey "\033[1~" beginning-of-line
bindkey "\033[4~" end-of-line
---------------
source ~/.zshrc
|
cs |

- 현재 디렉터리만 출력
vi ~/.oh-my-zsh/themes/agnoster.zsh-theme
그리고 다음과 같이 %c로 변경

source ~/.zshrc
(7) 오류 해결
- root에 zsh를 잘못 설치해준경우
좀 폼나게 명령어를 한줄로 친답시고 root 계정을 제대로 말아먹었다...
root가 쉘을 정상적으로 찾아줄 수 있도록 passwd를 수정해주자

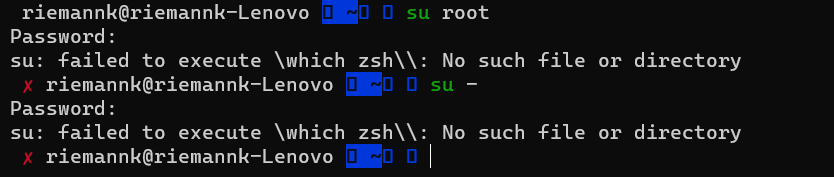
sudo vi /etc/passwd로 passwd를 열어서
root의 쉘을 제대로 변경해준다


해결 완료

- cd 명령어가 잘 안되는 경우
autojump를 설치하고 나니 /usr/bin/env: ‘python’: No such file or directory 에러가 뜬다...
이동 자체는 잘 되긴하지만 저런 에러를 달고 살순 없으니 해결해보자

구글링 좀 해보니 python2.7이 설치 안되서 그런것 같다.. 설치해보자
아니다 brtech.tistory.com/45 랑 salguworld.tistory.com/11 따라해보며 약을 먹어봤지만 다 아니였다.
sudo ln -s /usr/bin/python3 /usr/bin/python 이거 입력해주면 된다.

- terminal D2Coding 폰트 적용하기 (안깨지게끔)


좌측 하단부에 있는 Json 파일 열기 버튼을 클릭해준다.
편집기에서 "defaults" 부분에 아래 코드를 추가해준다.
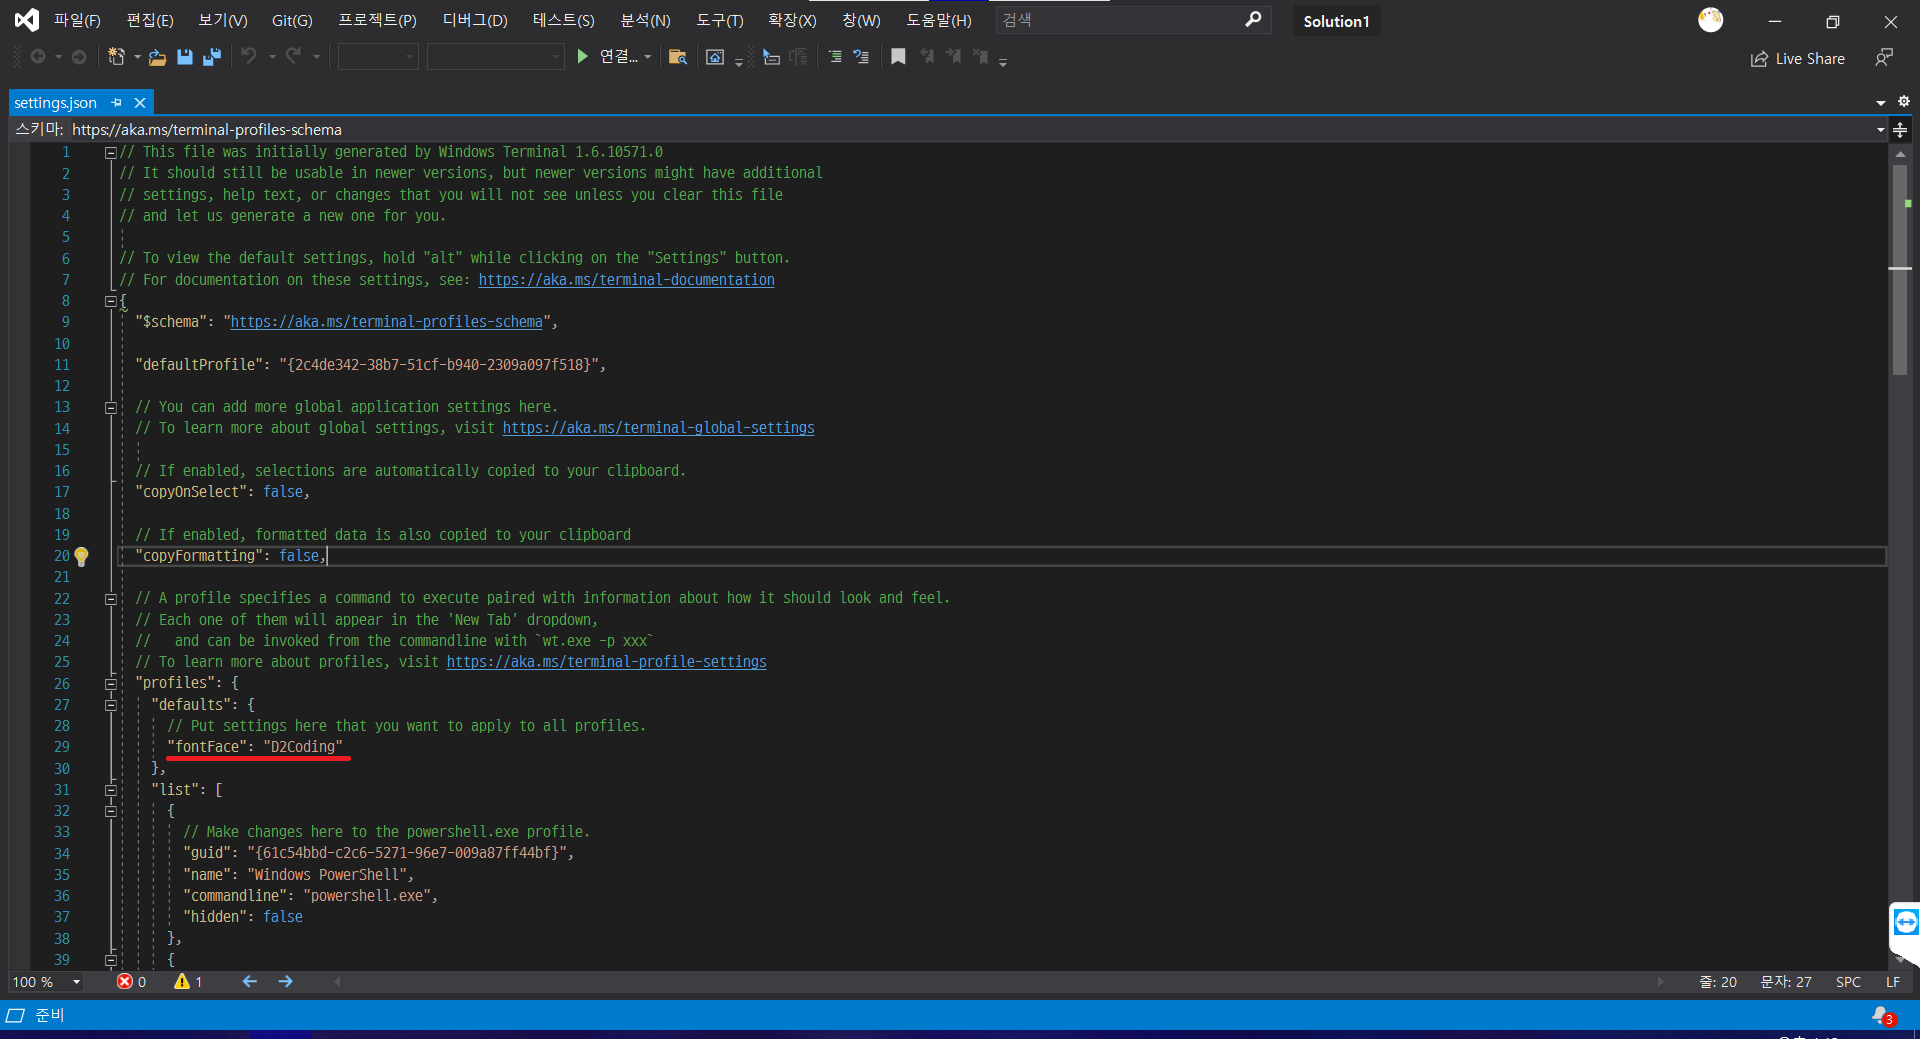
저장하고 나가면 끝

- terminal 시작시 리눅스 실행시키기


기본 프로필을 리눅스로 바꿔준다.
- zsh update 후 에러 발생시 (parse error near `<<<')
cd $ZSH
git config core.autocrlf input
git rm --cached -r .
git reset --hard
References
zsh 설치 및 설정
- thisblogbusy.tistory.com/entry/zsh-install-settings-with-oh-my-zsh : 설치 & 플러그인 & 멀티라인
- tutorialpost.apptilus.com/code/posts/tools/using-zsh-oh-my-zsh/ : 설치
- blog.jeuke.com/77 : Autojump & Autosuggestion
- blog.jeuke.com/76?category=916220 : 설치 & 멀티라인 & hostname
- gist.github.com/Xednicoder/b6522a1e70e75c0118b966cd02fbce14 : Autojump & Autosuggestion
- nolboo.kim/blog/2015/08/21/oh-my-zsh/ : 설치 & alias-tips
- medium.com/harrythegreat/oh-my-zsh-iterm2%EB%A1%9C-%ED%84%B0%EB%AF%B8%EB%84%90%EC%9D%84-%EB%8D%94-%EA%B0%95%EB%A0%A5%ED%95%98%EA%B2%8C-a105f2c01bec : 설치 & 플러그인 & 멀티라인
- medium.com/code-kings/zsh-oh-my-zsh-how-to-configure-home-and-end-keys-to-work-properly-while-connecting-putty-ssh-to-ba94a0835672 : zsh Home End 키 활성화
갓-허브
- github.com/zsh-users/zsh-syntax-highlighting/blob/master/INSTALL.md
- github.com/zsh-users/zsh-autosuggestions/blob/master/INSTALL.md
오류 해결
- bbs.archlinux.org/viewtopic.php?id=206331 : su: failed to execute \which zsh\\: No such file or directory
- askubuntu.com/questions/942930/usr-bin-env-python-no-such-file-or-directory : /usr/bin/env: ‘python’: No such file or directory
- psychoria.tistory.com/730 : terminal 폰트 적용
- https://github.com/agnoster/agnoster-zsh-theme/issues/155 : parse error near `<<<'